
Last updated: June 6, 2025
Available with any of the following subscriptions, except where noted:
|
|
|
|
|
|
|
|
|
|
Please note: starting on June 2, 2025, Breeze Intelligence Credits will transition to HubSpot Credits, and Customer Agent will begin consuming HubSpot Credits.
After creating your customer agent and assigning it to your channels, you can edit its content sources and assign or remove it from live channels. You can also edit your customer agent's profile, and customize hand-off messages.
If you have an Enterprise subscription, you can keep track of any create, edit, publish, unpublish, or delete actions in your account's centralized audit log.
Please note: only users with the Customer agent editor permission can create, edit and manage the customer agent.
Edit content sources
You can add, edit or remove the content sources your customer agent uses to answer questions.
Add content sources
- In your HubSpot account, navigate to Service > Customer Agent.
- Navigate to the Content tab.
- To add a content source, click Add content in the top right. Then, select an option:
- To sync HubSpot content or import public URLs, select HubSpot content & links.
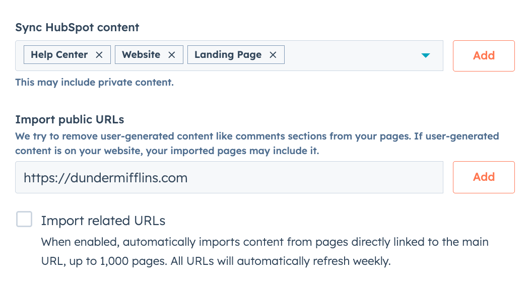
- Click the Sync HubSpot content dropdown menu and select HubSpot content. You can sync knowledge base articles, website pages, landing pages, and blogs. Then, click Add.
- To sync HubSpot content or import public URLs, select HubSpot content & links.
-
-
- In the Import public URLs field, enter a public URL. Then, click Add.
- To sync all associated pages on a domain, select the Import related URLs checkbox. Up to 1,000 URLs within the domain will be automatically crawled and synced.
-
- To use an existing file or upload a file, select Files.
-
- In the right panel, search for and select an existing file. Then, click Insert files.
- To upload a new file, click Upload.
- To create a short answer, select Short answers. In the right panel, use the text boxes to edit the question or answer. Then, click Create.

Edit short answers
- In your HubSpot account, navigate to Service > Customer Agent.
- Navigate to the Content tab.
- In the left sidebar, click Short answer.
- Click the name of the answer you want to edit.
- In the right panel, use the text boxes to edit the question or answer.
- Once you're done, click Save.
Please note: the customer agent will be automatically re-synced if any updates are made to synced knowledge base articles. Other content sources are automatically re-synced on a weekly basis.
Remove content sources
- In your HubSpot account, navigate to Service > Customer Agent.
- Navigate to the Content tab.
- In the left sidebar, select a source (E.g., Knowledge Base or Website)
- In the table view, select the checkbox next to the source you want to remove, then click Remove as source.

- To prevent the customer agent from citing the content, toggle the citations switch off. If you're using private content, citations will be automatically toggled off.

Manage the channels the customer agent is assigned to
- In your HubSpot account, navigate to Service > Customer Agent.
- Navigate to the Assignment tab.
- To remove the agent from the channel, hover over the channel and click Unassign agent.
- To edit the channel's routing rules, hover over the channel and click Edit routing.

- On the Manage Handoff page, you can choose to keep your agent assigned or transfer to a human agent.
- Handoff to human agent: if your customer agent can’t answer a question, it will ask the visitor to rephrase or transfer to an available human agent. Learn more about managing user availability.
- Click the If the AI can’t answer, assign to dropdown to select users or teams:
- On the Manage Handoff page, you can choose to keep your agent assigned or transfer to a human agent.
Please note: only users with assigned Sales Hub or Service Hub paid seats can be included in your routing rules. Learn more about automatic routing requirements.
-
-
- By default, the chat avatar will update to the newly assigned user. To keep the current avatar, uncheck Update chat heading avatar.
-
-
- Stay assigned: if your customer agent can’t answer a question, it sends the Hand-off unavailable message and stays assigned. Learn how to edit your hand-off messages.
- Click Save.
- To assign your customer agent to a channel, click Assign in the top right. Learn more about

Pause customer agent assignment
The customer agent uses HubSpot Credits. If your credits run out, the agent will temporarily stop being assigned to new conversations across any connected channels. Once you assign more credits, the agent will automatically resume handling conversations.
You can also manually pause the customer agent. This can be useful when updating or reviewing content sources, or making changes to the agent's configuration.
To manually pause the customer agent:
- In your HubSpot account, navigate to Service > Customer Agent.
- Navigate to the Assignment tab.
- Click Pause assignment.
- In the dialog box, click Pause assignment.

Once paused, the customer agent will continue to handle existing threads until the conversation is resolved, but won't be assigned to any new threads. New conversations will be assigned based on the rules you've configured on the Handoff page.
Please note: once customer agent assignment is paused, visitors will no longer see Powered by AI within the header of the live chat.
Configure your customer agent's settings
On the Configuration tab, you can edit your customer agent's profile and customize hand-off messages.
Edit your customer agent’s profile
To edit your customer agent profile:
- In your HubSpot account, navigate to Service > Customer Agent.
- Navigate to the Configuration tab.
- In the Agent Name field, enter a name for your customer agent.
- Click the Role dropdown menu and choose from the following options: Customer Support, Marketing Specialist , or Sales Representative.
- Click the Personality dropdown menu and assign your customer agent a set of traits and behavior. You can choose from the following options: Friendly , Professional , Casual , Empathetic , or Witty.

The customer agent will detect the customer's browser language and respond in that language. Learn more about HubSpot's language offerings.
Customize hand-off messages
You can customize the messages visitors see when they're transferred to your team, or if your team is unavailable.
Please note: the customer agent hand-off messages are sent based on user working hours and availability. Learn more about managing user working hours and availability.
To edit your customer agent's hand-off messages:
- In your HubSpot account, navigate to Service > Customer Agent.
- Navigate to the Configuration tab.
- In the left sidebar menu, click Hand-off.
- In the Availability Messaging section, use the text boxes to enter a message to display when your team is available, away, at max capacity, or outside of working hours.

- In the Triggers section, click Add trigger. Use the text box to enter a word or phrase that will trigger a hand-off. For example, cancellation or refund.

Analyze your customer agent's performance
On the Performance tab, learn how to analyze how your customer agent is performing and identify and address any knowledge gaps. Learn more about analyzing your customer agent.
